Tips on how to draw flames on a car easily.
 If you have to stray to figure out how to draw flames and make them look cool and rather not drawings that look like crab claws, you should not be worried. Drawing a cool flame can be difficult but with practice attaining the ability to draw nice flames is possible. It does not mean also that you need to be a good drawer or a talented one for you to be able to achieve this. Consistent practice and making attempts can lead you to achieve this incredible ability. One thing you have to be sure of is that you do not have to start out as an expert. Learning the Tips on how to draw flames on a car easily starts from a novice point. You need to be dedicated and committed to getting there. You will, therefore, start from trial and error point and develop slowly and get to the point that you want to be.
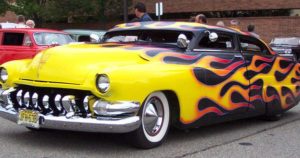
Real example of a car with flames on it.
Before you set out to paint any flame on a car it is important to note that the quality of the drawing will depend on the design as well as the vehicle on which the flame is to be drawn. The flame you are drawing has to be able to flow with curves as well as the overall shape of the surface. This means that it is not all about you slapping any set of flames on a care in an old way. For you to achieve that distinct drawing you have to plan and think it out properly before drawing. The following re Tips on how to draw flames on a car easily that you can easily adopt to draw a flame on a car.
Step 1
You have to start by drawing an ellipse. The ellipse will provide the foundation upon which you will be drawing the flame. In this way, it determines the size of the flame you will finally draw on the car. The smaller the ellipse the smaller the flame and the bigger the ellipse the bigger the flame will be. Once you have drawn the ellipse facing the direction you want, you can proceed and draw several flames in the ellipse. This will be done once you have washed the surface of the car clean to remove any form of dirt as well as contaminates in the surfaces of the car. You can wash the entire car; however, this depends on the size of the flame you would like to draw. Therefore you can even end up washing only the surface that you would like to have the drawing on.
Step 2 outline design
Take a 1/8 inch line tap that is fine and develops the design on the panel. Draw the design in the best way that impresses you because it will determine the outlook of the flame once the flame is completed. The design should be done properly because if it does not emerge properly the image will not also be proper.
Step 3 Outline the outline
Take a three-quarter inch tape and then make an outline of the fine line tape. When making the outline it is important that you take care not to sand past the edge of the outer tape. This can be achieved by sanding harder on the tips but reducing the intense when sanding on the edge. This would result to a slightly sanded outline which has the potential of improving the quality of the outline. The other approach you can take is to carry out an even sanding on the whole outline. This is appropriate approach because it will enable your design to have a matte look and not a faded look.
Step 5 Unmask the design
Once all these are done you can now unmask the design and leave it to dry. The steps are very easy to follow and the outcomes are very distinct. Following the above steps does not only give you an impressive outcome on the flame that you are doing on the car.
Apart from these, you might draw an image on the car by following the Tips on how to draw flames on a car easily but you might not like it. You should not worry because this can be removed. All that you have to do is to take 3000 grit and use it to sand the edge of the design. This will help to buff the area that has the compound used to draw the flame. Once you are done you can polish it and it is done.
What to do if you do not want to make your own design
You might not be interested in drawing the flame by yourself, you can consider 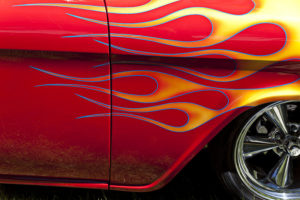 the services of 3M which specializes in making a kit that has everything you would want to have the image on your car. The adhesive paper that they provide you with allows you to print any image on it. This, therefore, means that you can draw the flame on it easily and have it on your car. Once you have drawn the flame you can cut the adhesive and stick it on your car. This method is very effective because it reduces the hustle that you have to go through by masking the section to be drawn. The kit that they provide you with is known as a Custom Image Kit.
How to duplicate the design in case it is on both sides of the car
This is very simple to follow what you have to do is to take a piece of masking paper or gift wrapping paper then put it over the first drawn design prior to unmasking it. Take a lead pencil and use it to outline the design on the gift wrapping paper. Once this is done you can cut the design out and utilize it for the other side of the drawing. The process is very simple and easy to follow. It also ensures that you customize the flame based on what you would like to appear on your car.
If you want to learn more about drawing cars, be sure to check out “How to Draw Cars Like A Pro“. It’s a very detailed and extremely well written guide on drawing and can help you learn more of the skills you need for detailing cars. It’s fast and easy to learn how to draw race cars. Give it a shot today!